Rockspace WiFi Extender Setup Guide
Add a Rockspace extender to your current network to increase the existing network speed and coverage. The Rockspace setup process may be accomplished in two ways, as mentioned here. Walk through the page and learn different methods of installing a Rockspace WiFi extender.
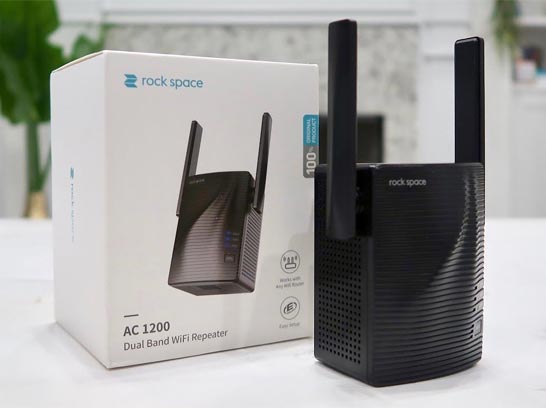
Important Note: The Rockspace extender setup procedures are applicable to the Rockspace AC1200, Rockspace AX1800, Rockspace AC2100, Rockspace AC750 dual-band WiFi range extender. If you bump into any problems during the Rockspace WiFi extender setup process, you can contact us at any hour of the day.
How to Setup Rockspace WiFi Extender?
WPS Method- WiFi Protected Setup (WPS) enables you to connect your Rockspace extender to a secure WiFi network without providing the re rockspace local credentials.
Manual Method- To execute the Rockspace WiFi extender setup manually, run any of your chosen web browsers from your desktop or laptop.
Rockspace WiFi Extender Setup Requirements
Before you begin the Rockspace setup procedure, keep the following points in mind:
- The Rockspace WiFi extender should be placed in the same space as your router.
- Check to see that the Rockspace extender is getting enough power.
- The wall socket you want to utilize for your Rockspace extender should be in good condition.
- Keep the default re rockspace local login information available.
- We are recommending you to have at least two web browsers installed on your device (computer or laptop). A scenario may arise in which you are unable to access the Rockspace setup page due to a web browser malfunction. In this scenario, you may use another browser.
- Bring just a non-damaged Ethernet wire into play.
So, these are some of the important considerations you should do to ensure a smooth Rockspace WiFi extender setup procedure. Let’s get started and find out how to setup Rockspace WiFi extender by employing the manual as well as WPS methods.
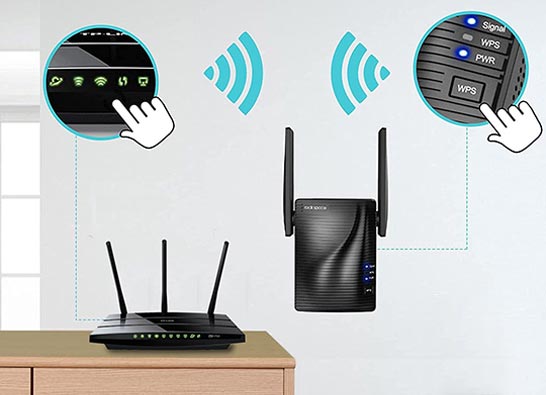
How to Setup Rockspace WiFi Extender Through WPS?
- Power up your Rockspace using a power outlet delivering optimum electricity.
- Install your Rockspace WiFi extender near your current WiFi router.
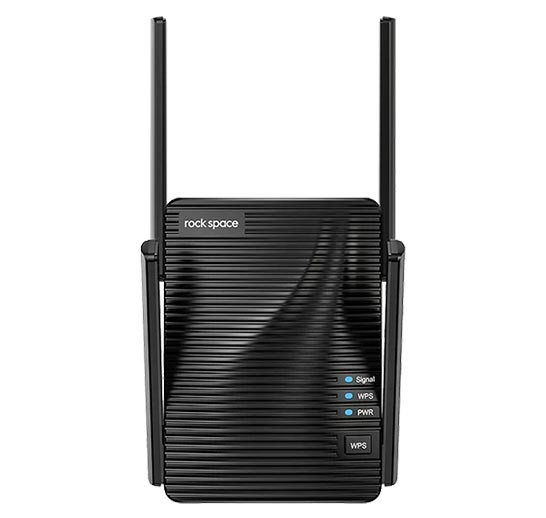
- Locate and press Power on the side or back of your Rockspace extender.
- Press the WPS button to continue.
- WPS is required for Rockspace AC1200, Rockspace AX1800, and Rockspace AC2100 setup.
- Place the Rockspace extender anywhere in the middle of the house with weak or no WiFi router signals.
Have you learned how to setup Rockspace WiFi extender with the assistance of the WPS method? Well, there is no need to access re rockspace local at all. Now, you can enjoy online activities by accessing your extender’s WiFi.
How to Setup Rockspace WiFi Extender via Manual Method?
The Rockspace WiFi extender setup seems to be pretty simple using the WPS approach. However, owing to an internal fault or weakness, you may be unable to finish your Rockspace setup. So, how to setup Rockspace WiFi extender setup without WPS to increase the capacity of your WiFi network? Fortunately, there is another Rockspace setup process to make the Rockspace extender operating. For Rockspace WiFi extender setup, you may use the installation assistant a.k.a web GUI of your Rockspace device. It’s a bit time-consuming, but it has a high Rockspace setup success rate. This approach also demands visiting re rockspace local.
In any case, if you get stuck or have difficulty with any of the Rockspace WiFi extender setup procedures, please contact us for immediate help with extender’s. Follow the instructions below to accomplish Rockspace WiFi extender setup via re rockspace local.
- Turn your WiFi extender after inserting its power adapter (if it uses) into an electrical outlet.
- Place your Rockspace extender near your current WiFi router.
- Press and hold the Power button.
- Connect your existing device (router or modem) to the Rockspace extender via a cable or wireless aid.
- To visit the re rockspace local web page, use a web browser on your desktop or laptop.
- Enter re rockspace local into the address field. Press the Enter key.
- The Rockspace admin web page will show up on the screen.
- Fill in the default re rockspace local login information and hit the Log In button.
- Now, heed to the displayed instructions on the Rockspace setup dashboard.
Place your WiFi extender in the zone with weak to no WiFi network signals after the Rockspace setup is complete.
That’s how to setup Rockspace WiFi extender. These instructions apply to every Rockspace wireless repeater. If you get stuck in the middle, feel free to contact our highly experienced specialists for help with Rockspace WiFi extender setup concerns. They will guide you thoroughly on how to setup Rockspace WiFi extender.
Re rockspace local Login Procedures
The manual Rockspace WiFi extender setup technique described above necessitates access to the re rockspace local web page for installation and configuration. However, some users are unable to utilize the re rockspace local login method. As a consequence, they are unable to install their Rockspace WiFi extender. Recognizing this necessity, we have also included the whole instructions for re rockspace local login here.
To access your Rockspace WiFi range extender, follow these steps:
- Start your PC or laptop.
- Launch your preferred internet browser.
- You may use any browser, including Google Chrome, Apple Safari, and Edge. However, be sure that the web browser you’re using is of the latest software version and does not house cache and browsing history.
- Enter re rockspace local in the URL box.
- The Rockspace extender login screen appears at the moment when you press the Enter key.
- Fill in the admin username and password in the appropriate boxes.
- Click Log In.
Kudos! You have completed the new extender login process. However, if you become entangled while executing the login procedure, don’t hesitate to contact our expert staff at any time.
Common Issues During Rockspace WiFi Extender Setup
- re rockspace local is down
- Internet access is disrupted
- WiFi connection failure
- Rockspace setup wizard refuses to open
- Errors in MAC address filtering
- Rockspace WiFi extender login page cannot be reached
- LED lights unstable on WiFi extender
- re rockspace local login password is incorrect
- The IP address cannot be accessed
- WiFi extender red light error
- Rockspace firmware cannot be updated
- WiFi extender is connected, but there is no internet connectivity
- Forget the default password for Rockspace extender
- Rockspace extender login could not be completed
- Unable to finish Rockspace WiFi extender setup due to VPN difficulties
Troubleshooting Rockspace WiFi Extender Setup Issues
- Check that the wall plug is not broken or shorted out.
- See to it that your range extender is getting enough power.
- Examine all of the wiring connections. Check that they are all precisely made and that zero of them are damaged or flipped.
- Next, keep your Rockspace WiFi extender at least two to three feet away from walls, microwave ovens, cordless phones, and items that reflect light, such as mirrors.
- If the Rockspace extender setup fails, power cycle your extender.
- Restore the Rockspace extender to its original factory settings.
There’s no need to panic if the aforementioned troubleshooting techniques don’t help you with re rockspace local login and Rockspace setup difficulties. Simply contact us at any time, and we will resolve any Rockspace WiFi extender setup concerns immediately.
Rockspace WiFi Extender Setup FAQs
Question 1: Rockspace setup wizard won’t open. Why?
Ans: The Rockspace setup wizard does not launch in the following situations:
- Firstly, if the internet connection is inadequate. Thus, bring the extender near to the router to turn your fate.
- Secondly, if the Rockspace device is not properly positioned. To make things good, position the extender in an interference-free zone.
- Thirdly, if your web browser has not been updated. Considering that, you should update it and remove pent-up files from your internet browser.
- If the extender has encountered minor bugs. Restart the Rockspace extender to get rid of them.
However, if the aforementioned methods do not fix your problem, contact our professionals.
Question 2: My Rockspace extender is glowing red. Please assist me!
Ans: Many users contact our technical support team because their Rockspace WiFi extender is glowing red. Here are some suggestions for resolving the red light problem with your extender:
- Restarting your extender can give it a new start.
- Connect the Rockspace wireless extender to another electrical outlet.
- Check to see whether the extender’s firmware has been updated. If not, do it immediately.
- Consider using a non-damaged Ethernet cable to link your Rockspace device to the primary router.
- Remove the extender from devices that produce radio-wave frequencies.
- Reset the extender to its factory preset settings (if needed) and configure it again. Refer to the aforediscussed sections to know how to setup Rockspace WiFi extender.
Question 3: My iPhone is not connecting with the Rockspace extender. How can it be fixed?
Ans: If you’re experiencing the iPhone not connecting to Rockspace extender problem, follow these steps:
- Scan your iPhone for viruses.
- To overcome technical issues, restart your iPhone. Repeat with your extender.
- Use your iPhone inside the WiFi range of your Rockspace extender.
- Access re rockspace local to update the firmware on your device.
- Check to see if any updates are available for your iPhone.
- Consider disabling your VPN or proxy server.