Wavlink N300 WiFi Repeater Setup
You may increase your current internet speed by as much as 300 Mbps ((Megabits per Second)) by performing Wavlink N300 WiFi repeater setup in your house. With cutting-edge technology, you may utilize both WiFi bands to create a super-fast internet connection, and simultaneous dual-band reduces interference. Any normal WiFi router is compatible with the Wavlink N300 WiFi repeater. Wavlink N300 Setup allows you to finally eliminate dead spots in your network.
You will now learn the fundamentals of doing Wavlink N300 WiFi repeater setup. Continue reading!
How to Do Wavlink N300 WiFi Repeater Setup?
When you spend money on a new Wavlink N300 range extender, you’ll also get a Wavlink handbook to help you set it up and get the most out of it. To get the most out of your new Wavlink device, the N300 handbook walks you through the whole setup process, beginning with purchasing the device. To get your Wavlink WiFi range extender up and running, just follow the manual’s instructions. However, just wait a minute! The instructions for the Wavlink N300 setup might be complicated for newcomers. If so, consult with our technical professionals for prompt and tailored help.
Different Methods to Do Wavlink N300 Setup
Knowing that the Wavlink N300 WiFi repeater setup can be done in one of three different ways is an important first step before learning how to set it up. We call these configurations “repeater,” “access point,” and “router,” respectively. The many modes of operation of the Wavlink N300 WiFi repeater are outlined below.
- If you do the Wavlink N300 setup in repeater mode, the extender will only receive signals through an Ethernet wire from the host network and retransmit them as WiFi.
- If you configure your Wavlink N300 to operate in access point mode, it will be able to act as an access point. The Wavlink WiFi extender may connect to your network through an Ethernet cable or an Ethernet adapter, but you’re free to use whichever you like.
- If you already have a modem at home and wish to utilize your Wavlink N300 WiFi repeater as a router, you may switch it to “Router Mode.”
Now that you know how to use the Wavlink N300 WiFi extender in both its default and advanced modes of operation, we can go through the specifics of setting it up. Two methods can be employed for Wavlink N300 WiFi repeater setup procedure; one being the manual method whereas the other put the WPS button to use.
Wavlink N300 WiFi Repeater Setup via WPS Method
To configure the WPS feature on the Wavlink N300 wireless repeater:
- A wall outlet close to your current WiFi router is ideal for use with the Wavlink N300 WiFi range extender.
- Shift your attention to the Mode Selector switch and move it to the Router/AP/ Repeater mode.
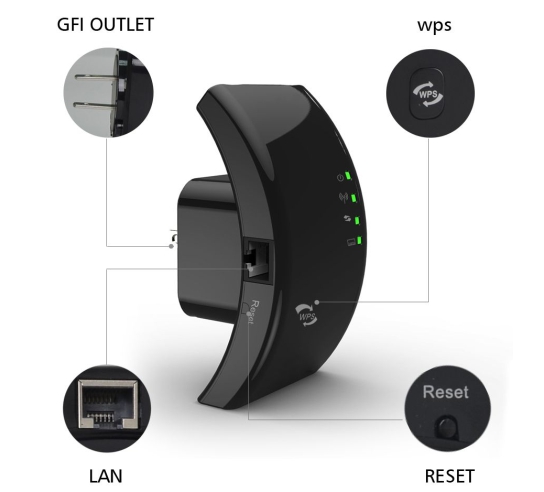
- Discover where the WPS button is on your Wavlink N300.
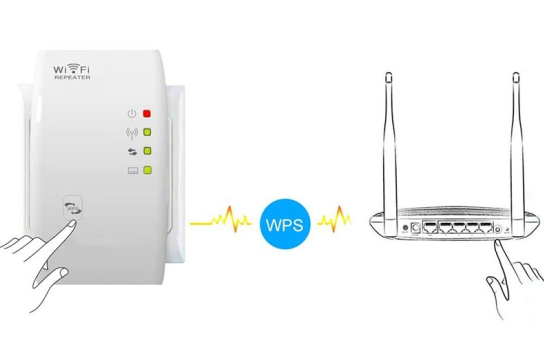
- Once you’ve done that, press and hold the WPS button on your Wavlink N300 range extender.
- Wait.
- Once the time has elapsed, press the WPS button on your current WiFi router to connect to the new one. Your Wavlink N300 range extender’s WPS and 2.4 GHz (Gigahertz) Link Rate LEDs will become solid after the WPS button has been successfully pressed.
- If your primary WiFi router supports the 5 GHz band, you can simply repeat the aforementioned steps to link your Wavlink N300 WiFi range extender to that frequency range.
After relocating your Wavlink WiFi extender, you may then link your gadgets to the extender’s WiFi network. But, in case you get stumbled upon any problem while executing the Wavlink N300 WiFi repeater setup process, our experts have always got your back.
Wavlink N300 WiFi Repeater Setup via Manual Method
Below you’ll find the steps necessary to set up your Wavlink N300 WiFi range extender with the help of the Wavlink N300 setup wizard.
- Connect the AC adapter to your Wavlink N300 WiFi repeater.
- Do not forget to position the Mode Selector switch to your preferred operating mode.
- Bring up your preferred web browser and type wifi.wavlink.com into the address box.
- A login window prompting you to key in the Wavlink N300 credentials will appear.
- Once you’re done filling in the admin details, click Login.
- Here you may find the brand new Extender Configuration page.
- To use a WiFi range extender, click the corresponding button and then Continue.
- Then, after typing in the network’s passphrase, click the Next button.
- Just select Continue once you’ve accessed the range extender.
- Take your Wavlink range extender offline and reposition it such that it is in close proximity to your current WiFi access point.
How to Change Wavlink N300 WiFi Repeater Setup Password?
By changing the Wavlink N300 setup password, your WiFi network will be more secure than before. Need not mention that WiFi leeches won’t be able to make their way to the network of your Wavlink repeater. The steps underneath will shed light on the steps of changing the Wavlink N300 WiFi repeater password after the completion of the installation process:
- Start up a computer and thereafter a web browser.
- The Wavlink N300 login page may be found by entering the default web URL into the browser’s address bar.
- Simply click the Login button after entering the default username and password.
- Choose the Setup Password option.
- You may now enter the new password for your N300.
- The Wavlink N300 setup wizard will notify you when you get successful in generating a strong login password.
- The modifications are immediately stored upon clicking the Apply button.
So, wasn’t the process of changing the Wavlink N300 WiFi repeater setup password super easy? In case your path to change the default password gets obstructed, consider pinging our experts for immediate support.
Wavlink N300 WiFi Repeater Firmware Update
As new technologies emerge, the tools and equipment we use now will eventually become obsolete. Either you upgrade to newer gadgets that include the most recent technologies, or you update the firmware on your current devices so you can take advantage of those innovations without shelling out extra cash for new hardware. Thus, after configuring your Wavlink N300 WiFi repeater, you should focus on updating the firmware.
The firmware update becomes necessary when you can’t figure out why your Wavlink N300 range extender has suddenly been acting erratically. After completing a successful Wavlink N300 setup, is your WiFi extender still not giving the promised internet speed? If this is the case, the firmware on your Wavlink N300 has to be updated immediately.
How to Update Wavlink N300 WiFi Repeater Firmware?
You must use a functional wall outlet to supply electricity to your Wavlink N300 WiFi repeater.
- Launch a browser that is compatible with your Wavlink N300 setup dashboard, and enter wifi.wavlink.com or the repeater’s default IP address into the address bar.
- The login page for the Wavlink N300 WiFi repeater is loaded.
- FYI, you need to download the firmware file for your N300 repeater from the official website.
- To update the firmware, choose the appropriate option.
- Update the firmware on your Wavlink extender by following the on-screen prompts.
Wavlink N300 WiFi Repeater Setup Problems
- I can’t get the setup since I forget the password
- I have a Wavlink N300 WiFi range extender, but it isn’t working
- Login issues with the N300 WiFi Extender
- Problems with connecting to the internet using an N300 range extender
- Wavlink N300 WiFi repeater does not establish a connection with the router
- The LEDs on my Wavlink WiFi range extender keep flickering
- After setting up the Wavlink extender, Wavlink N300 setup keeps popping up
- I am unable to launch the Wavlink N300 setup wizard
- The firmware on my Wavlink N300 range extender won’t update
- I am unable to reset my Wavlink N300 WiFi range extender
- Wifi.wavlink.com not working properly
- Problems connecting to the extender’s default IP address from a computer
- Incorrect username or password error
- Lost the password to my Wavlink N300 WiFi repeater
- Unable to determine the name of the network on which the Wavlink extender is connected (SSID).
Fix Wavlink N300 WiFi Repeater Setup Issues
Get your Wavlink N300 WiFi range extender up and running in no time by following the troubleshooting procedures provided below:
- Connect the power adapter to the working wall socket before using the Wavlink N300 WiFi range extender.
- As an added precaution, keep your current WiFi router within range of your Wavlink extender.
- Run an Ethernet connection from your router to the Wavlink extender.
- Input the right address, either wifi.wavlink.com or ap.setup, into your browser’s address bar.
- Update your browser to the latest version.
- When you’re done setting up your Wavlink range extender, be sure to change the default login credentials.
- Avoid putting your Wavlink N300 WiFi range extender near any metal appliances, baby monitors, security alarms, mixer grinders, thick walls, microwaves, cordless phones, etc.
- Always keep your current router and the Wavlink range extender’s software up to date.
- Case sensitivity applies to the Wavlink N300 administrator password. So, use them wisely.
- Put your Wavlink N300 range extender wherever it won’t encounter any WiFi interference.
Following the aforementioned instructions, doing Wavlink N300 WiFi repeater setup will be a breeze. Contact our technical team nevertheless if you feel like you’re not getting desired outcomes with respect to the Wavlink N300 setup process.