The dual-band Wavlink AC1200 extender is the best option to enhance the existing internet signals. It removes the dead zone areas and provides blazing internet speed in every corner of your house. Several users are grappling to install the Wavlink AC1200 extender. Are you also not able to perform Wavlink AC1200 setup? Well, we suppose that you are experiencing this problem because you followed the wrong approach. But, no need to worry. In this guide, we will cover all the three methods in detail. So, keep reading.
Walk through the list that tells you about the prerequisites for the Wavlink AC1200 extender setup.
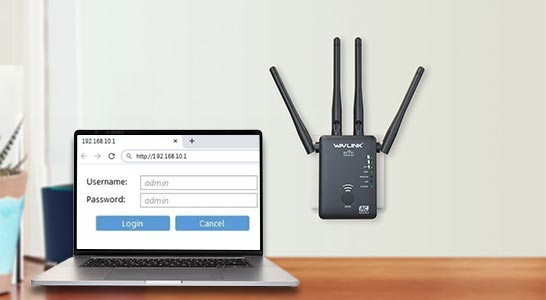
Note: You can also use 192.168.10.1 instead of the web address. FYI, it is the default IP address of the range extender.
The next way to configure the Wavlink AC1200 extender is in AP mode. For this, you need an Ethernet cable to connect the WiFi extender and router. Follow the instructions mentioned below in the exact order to set up the Wavlink AC1200 extender in AP Mode in a trouble-free way.

In this way, you will be able to finish the Wavlink AC1200 extender set up in Access Point Mode. But, sometimes most of the users are stuck with this setup process. If you are also facing this problem, no worries.
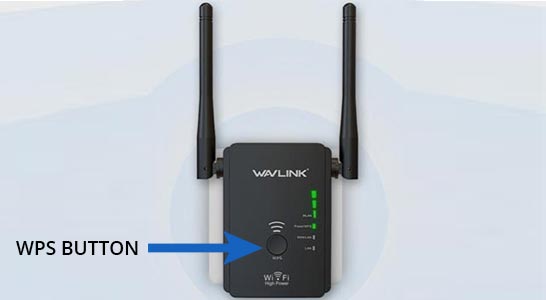
We still have one more method to install the Wavlink AC1200 extender i.e. WPS method. If you have no idea then refer to the section given below:
In this way, you can easily perform the Wavlink AC1200 setup in a hassle-free way.
Disclaimer: Apsetupwavlink.net is completely an autonomous service provider for various WiFi devices. All third party trademarks, brand names, products, and services are used only for informational and referential purpose. We hereby disclaim any sponsorship, affiliation, or endorsement of any such third party brand, product, or service. Our services are provided only on request by users.