How to Connect Wavlink Extender to Wireless Router and PC?
Are you interested in executing the Wavlink setup process for extended internet coverage? Yes? Well then, you should know that in order to go about the procedure, one most important thing is to make the right connections. There are two very significant connections which you ought to make:
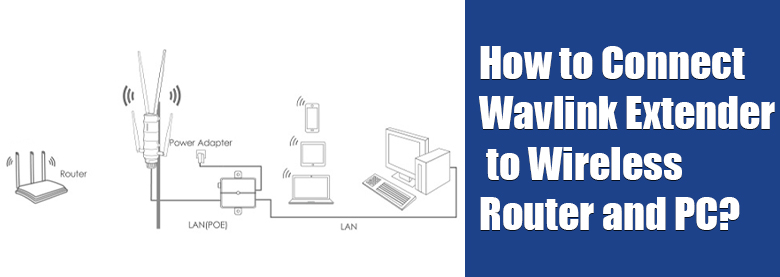
- Connect Wavlink wireless extender to the host router
- Connect Wavlink range extender to the client device
Now, the question is, how? Well, it is not that hard. However, if you still feel that you need help regarding the same, it is recommended that you walk through the information given in this blog post and learn how to connect Wavlink extender to the host router and the client device in a hassle-free manner. But, before you do so, it is recommended that you get access to two damage-free Ethernet cable. It should not have any cuts on or in it.
How to Connect Wavlink Extender to Host Router?

Right before you create a connection between the networking devices, make sure that the router as well as the extender are properly plugged into their respective outlets and powered on. Otherwise, you will come across Wavlink extender setup issues.
- Get access to an Ethernet cable and connect it to the port located on the extender.
- Make sure that you connect the cable to the right port.
- Now, insert the other end of the cable to the port on the host router.
- Wait for more than 30 seconds.
- Soon the LED lights on both your devices will become solid.
Precaution: It is recommended that you clean the Ethernet ports on the wireless range extender as well as the host router with a cotton swab before you attempt to connect the networking devices with the help of an Ethernet cable.
How to Connect Wavlink Extender to Client Device?
Wired Method
There are two methods through which you can connect the Wavlink wireless range extender to the host router: wireless and wired. As you will read further, you will become aware of how to execute both these methods.
- Use the second spare Ethernet cable for this method.
- Plug one end into the Wavlink range extender.
- Connect the other end to the port located on the PC.
- Hold on for a couple of seconds for the connection to get established.
- The LED light will soon change color.
Precaution: Ensure that the distance between the extender and the PC is not too much. You can stretch the Ethernet cable only to an extent. If the distance is too much, the cable will keep getting unplugged. To prevent this from happening, do as suggested.
Wireless Method
There are many users who prefer not getting stuck in the web of wires. In case you are one of them, then the wireless method is right for you in learning how to connect Wavlink extender to the client device or PC in a happy-go-lucky manner.
- Access the WiFi utility on your client device.
- Locate and select the network of your Wavlink wireless extender.
- It will be something like Wavlink extender setup-xxx.
- Select it and enter the right password.
- Click the Connect button and hold on for some time.
Precaution: To avoid making mistakes while entering the password, it is recommended that you ensure that you are entering the correct one. This can be done if you read the info which is given in the product or user manual. You can also refer to the product label.
Now that you have learned how to connect Wavlink extender to the host router and the client device, access the default web address of the extender in the address bar of the web or internet browser which you usually use, and press the Enter key. Once you are on the login page, enter the login details into the correct fields, and land on the main dashboard. There, you will find some instructions. Follow them to finish the Wavlink setup process.
Final Note
We are putting an end to this guide discussing the process of how to connect Wavlink extender to the router and PC in a hassle-free manner. Now that you have made the required connections, we hope that setting up your device will become easy for you.